Thursday, September 27, 2012

Hey Ghoulfriend!


I don't know about you, but as much I LOVE Halloween and Halloween stamps, I don't always send cards out in time for the spooky night!  :)  I created this card for a friend of mine who has a Halloween birthday.  I'm hoping to get this in the mail so she received it for her birthday!!  I thought the new Bake Me a Cake Die from Taylored Expressions would look cute as a Halloween cake! 

I used papers from the Chillingsworth Manor Collection from Echo Park.  The witch is from the Fangtastic set and the greeting is from the Toil & Trouble set.  After assembling the cake with different pieces of the patterned paper, I added some Stardust Stickles to it.  I tied some Burlap Twine around the cake to attach the tag.  Behind the cake is a piece of black cardstock I die cut using the Frame It Up 1 Die.  Of course I had to add a spiderweb by using the new Spiders & Spiderweb Die

The inside greeting is from the Build a Treat set.  So, are you good at getting those Halloween cards in the mail?  I hope I've challenged you to do that!  :)  Thanks for stopping by today and have a great day!


Tuesday, September 25, 2012

Baker's Dozen Studio Challenge - September


It's time for the Baker's Dozen Studio Challenge. This is a monthly opportunity for us to share what makes our stamping studios hum. Each month we will have a fun, crafty question so we can share our favorites, some tips and tricks, stamping advice and more.

The question for September is:
Within Arm's Reach - What do you keep within arm's reach at your stamp table? Show us what you have access to without leaving your seat. What organization methods do you use? Tell us which ones you love and which ones you'd like to change.

My studio space is not as organized as I'd like it to be.  We moved this summer, so I'm still deciding on certain things and sorting through stuff that I didn't know I had ;) until I had to pack everything up!  First of all, I stand to craft.  I've trying sitting, but I just don't like it.  I prefer to stand and already be on my feet if I need to get something from another part of my room. . .and I'm already up when it's time to run after the kids to see what they're up to!  :) 

My table is counter height and it's an "island" in my studio.  I like to be able to walk around the table and work on the other side for diecutting.  I like to keep it as cleared off as possible, but the things I keep on it for easy access are my dies that I work with the most, my craft bag with various adhesives, scissors and other odds and ends, and my basket that has my acrylic blocks and sometimes embellishments that I just got and plan on using. 


Underneath my stamp table is a cart which contains my most used inks, embossing folders, ribbons and other embellishments.  I open these drawers each day that I craft, so I like to have it close.  Of course, next to that is the trash can.  You can't see it in photos, but "behind" where I stand to craft is my computer and desk. 

Here are a few views of my shelving in my studio space where I keep stamp sets, diecutting machines, papers, etc.  You can see my collection of TE stamps in the Mini & Petite Storage Boxes.  I've told you how much I LOVE my Key Ingredients Subscription, and you can see all of those in the last bookshelf pic. 


One thing I'm trying to change is my die storage.  The plastic box that I used was fine when I didn't have as many dies, but now it is overflowing and when I'm searching for a particular die, it's frustrating to look through this box.  I saw an idea for storing dies in CD sleeves, so I thought I'd try that.  I had the box on hand, so I bought CD sleeves.  I write on the top left corner, the names of the dies in the sleeve and on the right corner, the company whose dies they are.  It's going to take me a while to finish this changeover, but I LOVE how I can see in the window of the sleeves and how I'll just be able to look through them like files. Plus, I can keep any templates I've made for alignment WITH the die instead of having to create a new one.


I hope you've enjoyed the tour of my stamping space!  I can't wait to see what the rest of the Baker's Dozen is sharing!  You can visit each of the blogs below for a peek into their stamping space!!  Thanks for stopping by and have a great day!

  • Cammie King (Guest Designer)
  • Jen Shults
  • Jodi Collins
  • Karen Giron
  • Melody Rupple
  • Regina Mangum
  • Sankari Wegman
  • Shannon White
  • Shelly Mercado
  • Stephanie Kraft
  • Taylor VanBruggen
  • Wanda Guess


  • Sunday, September 23, 2012

    Crafty Friends Challenge #7


    The latest Crafty Friends Challenge is hosted by Beate and it's anything Halloween!!  I decided to go with a little treat package for my project.  I used the Boo To You and Bountiful Harvest sets from Verve for my little box. 

    I stamped the images and colored them with Copic markers.  After stamping and embossing the sentiment directly on the box, I cut out the colored images and adhered them to the box using foam tape.  I added some green filler and there you have it. . .it's ready for a little treat!

    We'd LOVE for you to play along in our challenge.  You can head over to the Crafty Friends Challenge Blog for the details of playing along and to see my Crafty Friends' take on the challenge!  Thanks for stopping by and have a wonderful Sunday!!  SUPPLIES USED:  Stamps- Boo To You, Bountiful Harvest (Verve Stamps); Ink- Tuxedo Black (Tsukineko); Paper- True Black (PTI), white (Georgia-Pacific); Accessories- Favor Box 3 Die (Papertrey Ink), Copic markers, Stardust Stickles


    Saturday, September 22, 2012

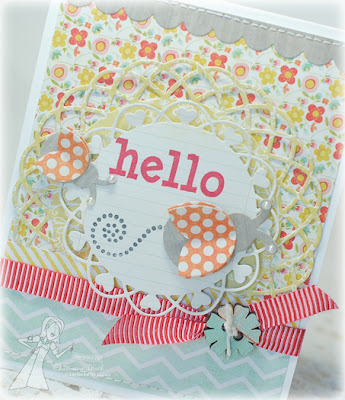
    Hello


    I have a card to share with you that I created a couple weeks ago but never shared here.  It's a card that uses the September Key Ingredients Subscription from Taylored Expressions.  I just LOVE the papers in the kit and I especially loved this polka dot paper.  I thought it would be really cute to get out my Bugabee Bug Dies and make a little ladybug card!  I used little pearls from the kit on the antennae. The sentiment is from the Bugabee set. 

    I used the Layering Doily Die Medium to die cut a piece of the patterned paper and then stamped the sentiment and flight trail.  I added a scalloped piece to the top of the card using the Small Scallop Border Die.  The ribbon is from the Key Ingredients as is the adorable little wooden button!  You can read all of the details about the Key Ingredients Subscriptions HERE along with finding even more coordinating products!!   Thanks for stopping by today and have a great day!


    Thursday, September 20, 2012

    Best Witches

    Hello there!  I hope your day is off to a good start!  I had a tough time getting out of bed this morning and that's VERY unlike me. . .at least when I have the alarm set.  The alarm barely has a chance to go off and I'm already out of bed and dressed!  ;)  Hopefully this coffee with remedy that!

    Today I have a card for you using one of the newest sets from Taylored Expressions, Fa-BOO-lous.  I started by using Jen's Deconstructed Sketch No. 69.  I decided to use the Tricks & Treats Project Pantry for my card.  I stamped the image from Fa-BOO-lous and colored it using Copic markers.  I stamped the spiders in the image another time, cut them out and them mounted over the original stamped spiders with foam tape.  I also covered them with Diamond Stickles and it gives them this really cool effect. . .especially in pictures with how the light picks it up.  They look electric, don't they?  Like each one is lit up!  lol

    I die cut two spider webs using the new Spiders & Spiderweb Die.  Once everything was adhered in place, I stitched around the edge of the card.  Even though there's not a specific place in the sketch for a sentiment, I had to add one.  :)  The card just needed something in that spot! 

    Thanks for stopping by today and have a wonderful day!  SUPPLIES USED:  Stamps- Fa-BOO-lous (Taylored Expressions); Ink- Onyx Black (Versafine), Tuxedo Black (Tsukineko); Paper- Tricks & Treats Project Pantry (Taylored Expressions); Accessories- Spiders & Spiderweb Die, polka dot ribbon (Taylored Expressions), Diamond Stickles, Copic markers;  Finished card measures 5.5"x4.25"


    Tuesday, September 18, 2012

    September Diva Dare

    The September Diva Dare is going on over at the Verve Blog!  This month's theme is Fanspiration!  The Divas are sharing creations with new Verve that were inspired by creations from Verve Fans!!

    I really had a tough time with this dare because I couldn't decide on A card. It took me a while just to narrow it down from all the fabulous Verve Fan creations in the gallery. . .but I still ended up with two that I just couldn't decide between! One of the cards I was so inspired by is THIS CARD from girlgeek101. This card is totally my style. I LOVE how Audrie used the embossing to add detail to this simple but elegant card along with that pop of color with the flower image. I created my card using the Learning To Sail set. Since the stamps I used to stamp behind the sentiment were line stamps and not silhouette, I added a border of cardstock in the same color as the ship to bring it out a little more.
    I used the Beaded Oval Nestabilities for my focal piece. I'm not sure how well it shows in the picture, but I added a tranparent pearl on each "bead" with a Viva Pearl Pen. I thought it would be a neat detail that added to the water theme. :)

    The other card that I just couldn't decide between was THIS CARD from Jen Mitchell. I just LOVED the colors that Jen used in her card. I LOVE the warm, Fall colors with a pop of red! I also loved Jen's layout. I just changed the stamps and the papers for my card and added a sentiment using the Lean On Me set with the leaves from Dream Big.

    I die cut the flowers using the Pointed Flowers Die Set, stamped them in red ink and then used a blender pen with the ink pad to color them. The leaves were die cut using the Dreamy Leaves Die Set. I also used the Rounded Rectangle Die as well as the Rounded Scallop Frame Die with the border stamp from the Treasured Words set.

    For more Fanspiration and all of the details, visit the Verve Blog!!


    Friday, September 14, 2012

    Last Card Standing at TE!!!


    Taylored Expressions is proud to announce the premiere of a new and exciting stamping talent competition, Last Card Standing. Based in part on very popular reality competitions such as Last Comic Standing, Project Runway, and Chopped, TE is looking for the very best and creative card-makers to stamp their way to the top. Each week, finalists will be challenged to create a themed card for a panel of celebrity judges in hope of avoiding elimination. Finally, the Top 5 Finalists will be voted on by the public, with the stamper receiving the most votes to win the title of Last Card Standing!

    What’s at stake? An amazing prize package that includes a 3 month subscription to the Key Ingredients kit club plus 2 full size stamp sets of the winner's choice and a coveted Guest Designer spot for the November/December Release!

    The competition has begun with the Open Casting Round. To enter, simply upload your best cards to your Splitcoaststampers Gallery using keyword: TELASTCARD. For this round, ANYTHING GOES -- Birthday, Thank You, Holidays, Get Well, Congratulations...the sky’s the limit! The only requirement is that you use at least 1 stamped image from Taylored Expressions. Do you have a card that you think could get you a callback to the next round? Go for it -- submissions do NOT have to be a new creation for the Open Casting Round and you may enter as many cards as you want! Both new and old projects will be considered.

    Deadline for submission to Open Casting Round: Thursday, September 20, 2012 by 11:59 pm PST.

    For contest details, visit the Taylored Expressions Member Company Forum at Splitcoaststampers. Good luck!


    Thursday, September 13, 2012

    Taylored Expressions Calendar Challenge September


    It's time for another Calendar Challenge at Taylored Expressions! If you haven't played along yet, you can find all of the details on Taylor's Blog. The requirement to play is to use TE Calendar products, but TE stamps are NOT required. For everyone who plays in 10 or more of these monthly calendar challenges in 2012, there will be a random draw for a TE prize pack valued at over $150!!! 

    I used the Desktop Acrylic Base calendar product along with the Mini Tear-Off Calendar and the Make the Grade stamp set.  I thought a calendar page having to do with school was perfect for September.  I stamped the little schoolhouse twice, once on white cardstock and once onto patterned paper and paper pieced it.  I used the Grass Border Die to add a little grass and the Cloud Border Die to add some beautiful clouds in the sky. 

    If you play along, there will be a linky at the bottom of Taylor's post for you to post your link. It will remain open all year, so you have the option to go back and catch up if you start playing late. The KEYWORD for posting to SCS or other on-line galleries is TECALCHAL. We hope you'll play along! Thanks for stopping by and enjoy the rest of the Calendar Hop!

    Jodi Collins
    Karen Giron
    Melody Rupple
    Sankari Wegman
    Shannon White
    Taylor VanBruggen
    Wanda Guess


    Monday, September 10, 2012

    TE September Key Ingredients Subscription


    The September Key Ingredients Subscription is now available at Taylored Expressions!  You've probably heard me rave about the Key Ingredients Subscriptions before, but I'm telling you I LOVE them!  It is so nice to have a new kit delivered to my door each month and it has coordinating patterned paper, cardstock and embellishments!  It also keeps me "up to date" on what papers are "in".  I don't always go shopping for paper, so it's nice for papers that I've seen around blogland to appear at my door each month!  :) 

    You can read all of the details HERE along with finding even more coordinating products!!  Today I have a scrapbook page to share with you using this month's kit.  It's a 6x6 page of my daughter Arwen.  I cut the "flags" out of one of the piece of patterned paper in the kit and framed her picture with them.  Her name was die cut using the Tall & Skinny Alpha Die Set.  I added some pearls and buttons from the kit as well as ruffling some of the ribbon for the top border of the picture. 


    I don't know how well you can see it in the picture, but the yellow piece of cardstock was embossed using the Houndstooth/Damask Impression Plate.  Thanks for stopping by today!  I hope your Monday is off to a great start!


    LinkWithin

    Related Posts with Thumbnails