Showing posts with label Papertrey Ink. Show all posts

Thursday, June 13, 2013

Make It Monday: Overlapping Ombre


It's been a long, long while since I've been able to participate in a Make It Monday Challenge, but I had some time this week and needed a birthday card, so I thought I'd put the two together!  This week's challenge is Overlapping Ombre.  I used the Sweet As Can Be set from Papertrey Ink for my card. 

I started by stamping the cone in Classic Kraft ink and then stamped the icecream in Berry Sorbet, Raspberry Fizz and Royal Velvet.  I added the cherry on top in Pure Poppy.  I stamped the sentiment in black and added the "sweet" in Pure Poppy as well.  To add a little accent on the top right, I die cut a flag using the Double-Ended Banners Die out of True Black cardstock.  Before adding the button with some Rustic Cream Button Twine, I die cut Flower Fusion #4 out of Ripe Avocado cardstock and added it behind the button. 

You can see other answers to the challenge HERE.  Thanks for stopping by!!


Thursday, February 14, 2013

Happy Valentine's Day!!

 
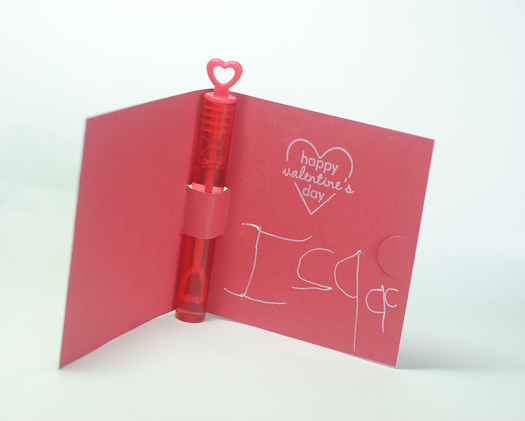
 Well, the Valentines are all made and taken to school, ready to be passed out!  It is nice to finally have that project completed!!  I thought I'd share with you the Valentines my kids made.  First up is my son, Isaac.  I pretty much created the whole thing.  He just signed his name on the insides.  :)  In preschool, they don't want you to address each Valentine because it just slows down the whole process of the children passing them out!  :)  I went with the chalkboard technique for my Isaac's Valentines.  I thought it would be simple.  I used the dinosaur from the Tremendous Treats:  Valentine set from Papertrey Ink.  I found these little valentine bubbles at Target, so I created a little card that would hold the bubbles inside.

All I did was cut two slits in the crease of the card.

Then I opened the card and reversed the portion between the two cuts to fold inside the card and then inserted the bubbles.  Simple!

My two daughters, however, wanted to do their own Valentines.  They were fine with mom making the actual card and stamping, but they wanted to color and assemble.  :)

Arwen created her cards using two of the monsters from the Love Monsters set from Taylored Expressions.  After she colored her monsters, we added one googly eye to go with the sentiment.  ;)  I love how the one monster ended up looking like he was giving a big wink.  lol
 In 1st grade, they bring home their class list and are expected to address each Valentine.  So, Arwen signed her name on the inside and addressed them on the back.
Savannah used the same set Arwen did, but she wanted to use different monsters and one different sentiment.  She chose the I {heart} U sentiment for the girls and "I only have eye for you" for the boys.  As you can see from her coloring, she added hair, bling and all sorts of extras!  :)
I hope you have a special Valentine's Day!  Thanks for stopping by!!


Tuesday, February 12, 2013

Happy Birthday To You


I don't know about you, but I'm in the midst of preparing Valentines for three of my kids to take to school.  It's a lot of fun, but as you could imagine, time consuming. :)  I thought I'd pop in and share another card I created using the free printable from PTI that I mentioned the other day.  This card uses Heather's design.  I printed the design on white cardstock and then again on Berry Sorbet.  Then I cut a window in the white cardstock design and attached it over the Berry Sorbet design with foam tape. 

For the background, I embossed a Kraft piece of cardstock with the Diagonal Stripes Impression Plate.  I rubbed the edges with white craft ink.  After mounting the whole piece onto a white card base, I punched some hearts from black cardstock and added those with some bling as accents. 

Thanks for stopping by today!  Have a wonderful day!


Saturday, February 9, 2013

PTI Free Printable Challenge


Papertrey Ink is celebrating their 6th Anniversary with lots of challenges and prizes.  One of the challenges was to create a card using one of the images from the free printable that the stamp designers put together.  I printed out the printable a couple of days ago, but I wasn't able to create anything until last night.  It's too late for them to be entered in the contest, but I created three, so I thought I'd share them over the next couple of days.  :)

The first one I'm sharing uses the image created by Maile.  Along with the printable image, I used the Background Basics: Super Stripes stamp set.  I put stripes on the card with Smokey Shadow, Black and Melon Berry Ink.  For the other angle, I masked off part of the card and added some polka dots from the Polka Dot Basics II stamp set in Berry Sorbet ink.  I stamped and die cut the piece from the Mat Stack 3 set using the Mat Stack 3 Die and added the free printable to it.  To finish the card, I rounded the bottom corners and added some bling! 

Thanks for stopping by today and have a great day!!


Saturday, December 29, 2012

Ornaments


I hope you all had a wonderful Christmas!!  We did!  Very busy with a touch of chaos, but good!  :)  I haven't been able to post for a while with all of the holiday activities and the kids all being home, so I have a little post that was something I created before Christmas.  I was helping with my oldest daughter's Christmas party at school and I was in charge of the craft.  They all created these adorable little mitten ornaments. 

I used the mitten die from Spellbinders along with some chipboard. . .a.k.a. cereal and cracker boxes from the kitchen to create the mitten.  The gingerbread and sentiment are from the Holiday Button Bits set along with the Holiday Button Bits Die Set from Papertrey Ink.  I was inspired by the card I made HERE.  I used Pure Poppy cardstock and some patterned papers from the Handmade Holiday Collection from Simple Stories. 

The ivy leaves were created with the Holly Jolly Die Collection.  I strung some jingle bells onto the jute and added some buttons to the gingerbread.  The kids LOVED making the ornaments.  I ended up making a few extras to use as tags on gifts.  They really dressed up little bags of sweets! 

Thanks for stopping by today!  Hope you're getting some crafty time in as well as LOTS of family time!  I'll check in again soon!


Thursday, December 13, 2012

Make It Monday - Layered Glitter Shapes


It has been a LONG while since I've played along with the Make It Monday Challenge.  I had a little time this week, so I decided to participate in this week's Layered Glitter Shapes Challenge.  I loved the technique.  I don't know about you, but I have actually tried attaching embellishments, etc on top of glitter and it's tough!  :)  I love how this technique looks.

I decided to make a mitten card using the Shape Up Series: Mitten Die.  I started by diecutting the mitten out of Pure Poppy cardstock and running through my Xyron.  Next I die cut some rick rack using the RickRack Border Die.  I decided to use the Holiday Button Bits set for my card.   I die cut and stamped the gingerbread man and stamped the sentiment.  Once I peeled off the backing from the Xyron, I attached the rick rack borders to the mitten as well as the gingerbread man and sentiment.  Once everything was attached to the card, I poured glitter over the card.  I die cut a mitten card base, attached my glittered mitten and there ya go! 

Thanks for stopping by today!  Hope you have a great day!  SUPPLIES USED: Stamps- Holiday Button Bits (PTI); Ink- Early Espresso (SU); Paper- Pure Poppy, Kraft (PTI); Accessories- Shape Up Series: Mitten Die, RickRack Border Die, button, button twine (PTI), glitter (Martha Stewart), Black Pearl Pen (Viva); 


Sunday, October 21, 2012

Crafty Friends Challenge #9


It's Sunday and time for another Crafty Friends Challenge!  This challenge is Glitz and Glam!!  Whether it's rhinestones or glitter, add some glitz and glam to your creation!  I decided to create a Fall card for a friend using the Floral Foliage set from Papertrey Ink. 

I die cut the tree using the coordinating Floral Foliage Die and then stamped the tree top and trunk.  I colored the flowers on the tree using a Copic marker, added Stardust Stickles and then rhinestones to the center of each flower.  The papers are from the Harvest Lane Collection from Simple Stories. 

For more details on how to play along and more inspiration, please visit the Crafty Friends Challenge Blog!  We hope you'll play along!  Thanks for stopping by and have a wonderful Sunday!  SUPPLIES USED:  Stamps- Floral Foliage (PTI); Ink- Walnut Stain Distress Ink (Ranger), Simply Chartruese, Dark Chocolate (PTI); Paper:  Harvest Lane Collection (Simple Stories), Kraft (PTI); Accessories- Floral Foliage Die (PTI), Stardust Stickles, rhinestones; 


Sunday, September 23, 2012

Crafty Friends Challenge #7


The latest Crafty Friends Challenge is hosted by Beate and it's anything Halloween!!  I decided to go with a little treat package for my project.  I used the Boo To You and Bountiful Harvest sets from Verve for my little box. 

I stamped the images and colored them with Copic markers.  After stamping and embossing the sentiment directly on the box, I cut out the colored images and adhered them to the box using foam tape.  I added some green filler and there you have it. . .it's ready for a little treat!

We'd LOVE for you to play along in our challenge.  You can head over to the Crafty Friends Challenge Blog for the details of playing along and to see my Crafty Friends' take on the challenge!  Thanks for stopping by and have a wonderful Sunday!!  SUPPLIES USED:  Stamps- Boo To You, Bountiful Harvest (Verve Stamps); Ink- Tuxedo Black (Tsukineko); Paper- True Black (PTI), white (Georgia-Pacific); Accessories- Favor Box 3 Die (Papertrey Ink), Copic markers, Stardust Stickles


Wednesday, August 1, 2012

Life Is Sweet


The Dare to Get Dirty Challenges are still happening!  Come find out what it's all about!  The card I have for you today is for the challenge of my sweet friend Julie Masse.  I hope you will all play along if you can - remember you have to be a Fan Club member to see the forum, but it's super quick and easy to join and the benefits are great!!
I used The Sweet Life set from Papertrey Ink for my card along with the The Sweet Life Die Collection.  The papers are from Bazzill and the Happy Go Lucky Collection from American Crafts. 

I also used the Simple Stripes Impression Plate on my card.  I finished it off with some pearls, glitter and ribbon!  Thanks for stopping by today and have a great day!


Sunday, May 20, 2012

Crafty Friends Challenge #4 - Anything But a Card


Happy Sunday!  Today starts a new challenge at Crafty Friends Challenges.  Heather challenged us to create Anything But a Card.  We hope you'll come play along!  Follow the link and post your creations under the challenge.


I decided to create a little basket.  I used the Favor It Box 2 Die from Papertrey Ink along with the Happy Trails stamp set and Happy Trails Die.  For the papers, I used the London Market Project Pantry from Taylored Expressions.  I stamped the sentiment and cut it into a banner.  I stamped the "trail" onto the box and mounted the sentiment over it.  I die cut the butterfly and then stamped it in Scarlet Jewel ink and covered it in glitter.  The butterfly was mounted to the card with foam tape and then pearls were added.  I added some filler to the box and it's ready to add that little gift for someone special! 

Thanks for stopping by today!  Have a wonderful day!  SUPPLIES USED:  Stamps- Happy Trails (PTI); Ink- Scarlet Jewel (PTI), Walnut Stain Distress (Ranger); Paper- London Market Project Pantry (Taylored Expressions); Accessories- Favor It Box 2 Die, Happy Trails Die (PTI); 


Sunday, May 6, 2012

Crafty Friends Challenge #3


Today I have a card for the Crafty Friends Challenge #3.  This week's challenge is an inspiration challenge!  You can use any or all of the colors in the photo or any of the images in the photo for your inspiration.  I used the Beautiful Blooms II set from Papertrey Ink for my card along with a sentiment from the Words of Wisdom set from Verve.  I also used the Beautiful Blooms II #2 Die Collection and Elegant Leaves Die.  The leaf image is from the Bloom & Grow set

Come play along with the challenge!  You can find all of the details here. We'd LOVE to see what you create!  Thanks for stopping by today and have a wonderful Sunday!  SUPPLIES USED:  Stamps- Stamps- Beautiful Blooms II (PTI), Words of Wisdom, Bloom & Grow (Verve STamps); Ink- Onyx Black (Versafine), New Leaf, Orange Zest (PTI); Paper- Kraft, True Black (PTI); Accessories- Beautiful BLooms II #2 Die Collection (PTI), Elegant Leaves Die (Verve Stamps), corner rounder, pearls (Want2Scrap), rhinestone brad (Making Memories);  Finished card measures 5.5"x4.25"


Sunday, April 22, 2012

Sweet


Today I have a simple little card that actually used some scraps from my scrap bin.  I often put little cards in the girls' lunches for school.  I decided to use the Lunchbox Note Die from Papertrey Ink to create these adorable little notes that are PERFECT to stick into school lunches!  :)   I used the Signature Series: Cupcake Mini Stamp Set and the Signature Series: Cupcake Die too.   Because the card is little, it's easy to use up scraps that aren't quite big enough for a full size card. 

I die cut a cupcake out of Hibiscus Burst cardstock, stamped the cupcake in white craft ink and added a little button with some hemp tied through it.  I adhered the cupcake to the card with foam tape.  Super simple, and super fast! 

Thanks for stopping by today!  Have a great day!  SUPPLIES USED:  Stamps- Signature Series: Cupcake Mini Stamp Set (PTI); Ink- Fresh Snow (PTI); Paper- Hibiscus Burst, Hawaiian Shores (PTI); Accessories- Lunchbox Note Die, Signature Series: Cupcake Die, button (PTI), hemp;  Finished card measures 2.75" square


Thursday, April 19, 2012

Notes


During one of my browsing sessions on Pinterest, I came across this AWESOME teacher gift set by Kim O'Connell.  I fell IN LOVE with it!  What a gorgeous set Kim made!  I stored it on one of my pin boards with the intention of making something like it.  Well, Savannah's teacher's birthday is tomorrow, so this was the perfect time for this project!  I loved Kim's card so much that I CASED it.  I just changed the card base color (to make it more manly) and wanted to use my Edgers #5 Dies from Papertrey Ink to make little "file folder" cards.  I even added the little score lines on the left edge to make them more authentic!  LOL  The set used for this was Teacher's Apple along with the Mat Stack 3 Die


I printed out of sheet with my computer generated sentiment and then cut them into strips, matted them with Pure Poppy cardstock and mounted them to the Mat Stack 3 piece that was die cut out of True Black.  I stamped the apples in Pure Poppy, Ripe Avocado and Dark Chocolate onto white cardstock and punched them out with a 1 3/4" circle punch. 

Once I had all the cards made, I started thinking about the packaging.  I decided it would neat to create an "expanding file folder" to hold the file folder notecards.  After trial and error on sizing, I finally created this box.  I used a Goody headband as the elastic to go around the box.  I punched a hole in the center of the lid flap, threaded the headband through and tied it in a knot on the other side.  The sentiment on the box is from the Take Note set.  The cards look like files in the box!  Hopefully Mr. D will like his birthday card set! 


Thanks for stopping by and have a great day!  SUPPLIES USED:  Stamps- Teacher's Apple, Take Note (PTI); Ink- Onyx Black (Versafine), Pure Poppy, Ripe Avocado, Dark Chocolate (PTI); Paper- Kraft, True Black, Pure Poppy (PTI);  Accessories- Edger's #5 Dies, Mat Stack 3 Die (PTI), 1 3/4" circle punch (SU), corner rounder, headband


LinkWithin

Related Posts with Thumbnails