Wednesday, December 30, 2009

I'd Rather Be Sewing

Here's a cute little card I made using the Crafty Expressions set from Taylored Expressions. I have a lot of crafty people in my family and a lot of them sew, which is something I don't do. I love that I'll be able to make them cards with this set that will be perfect for them!

I just took a piece of 3.5" square patterned paper and attached it to a 4.25" square card. I used my Stamp-a-ma-jig and the stitched border stamp from the set to add the stamped stitching around the border of the patterned paper. I think that's pretty neat how it looks. I stitched the x with linen thread on the Kraft piece of cardstock. Like I said, a pretty simple card but cute.

Thanks for stopping by today! Have a great day! SUPPLIES USED: Stamps- Crafty Expressions (Taylored Expressions); Ink- Berry Sorbet (PTI), Tuxedo Black (Tsukineko); Paper-white (Georgia-Pacific), Kraft (PTI); Accessories- circle and scallop circle punches (SU), Copic markers, Stamp-a-ma-jig; Finished card measures 4.25" square

Tuesday, December 29, 2009

Hangin' Out

Over the past week, I've really been able to spend a lot of quality time with my kids. Savannah received a few crafty items for Christmas, so I've been helping her with those which has been really nice. When I finally had some time to stamp, I thought I make a card for her. She always gets so tickled when I make a card especially for her. For this card, I used the Jungle Love set from Our Craft Lounge. I used the Indian Summer Fall Stack from Die Cut With a View. I love that green wood-grain paper!

I hope you're having a wonderful holiday season! I'm trying to get back into my routine and it isn't working quite yet! LOL Hopefully after the 1st of the year things will get back to normal around here. Thanks for stopping by and have a great day! SUPPLIES USED: Stamps- Jungle Love (Our Craft Lounge); Ink- Tuxedo Black (Tsukineko); Paper- Indian Summer Fall Stack (DCWV), True Black (PTI), Rich Razzleberry (SU); Accessories- circle and scallop circle punches (SU), paper piercer, Copic markers; Finished card measures 5.5"x4.25"

Monday, December 28, 2009

Christmas Bookmarks


ETA: I've had a few emails asking questions about how I made these with the magnets. I apologize for not being clear! :) These bookmarks are the leftover pieces of an A2 card (5.5"x4.25") that I cut down to 4.25" square. So, if you unfolded the bookmark, the piece measures 1.25" x 8.5". I adhered pieces of magnet strip on the inside bottom of the bookmarks. . .right about where "Merry & Bright" is. It "works" by opening the bookmark, sticking the book page in the middle and then closing the bookmark. The magnets will meet up with the book page in between them. Hope that explains it a little better!

Last week before Christmas break, I went into Savannah's kindergarten class to make a craft with the kids. I decided on these magnetic bookmarks made of scraplings. I just LOVE being able to use up scraps of paper, and what better way than to create something that kids will love?


I gave each child a packet of supplies. They each got a different color of paper for the base and the patterned paper matched the base. Also included in the packet was the ribbon, the stamped sentiment, magnets and the black scalloped circle. Each child got to pick and stamp their own image and then I punched that out for them with a circle punch. I expected everyone to choose the snowman, but surprisingly most kids chose "Rudolph". LOL They really loved stamping, coloring and putting their bookmarks together. They thought it was REALLY cool how the bookmark stuck to the page in the book!


I hope you all had a wonderful Christmas! I've been busy visiting and enjoying family, so I haven't been able to post. I thought I'd pop in quickly today and share this project with you. Hoping to get more stamping in soon! Thanks for stopping by and I hope you're enjoying your day!

Thursday, December 24, 2009

No Peeking!


Well, you can peek if you'd like! :) I have a project over on the Stamp a Sweet Impression blog today! Hope you like it!
If I don't get another chance to post over the next couple of days, please have a VERY MERRY CHRISTMAS! Wishing you the happiest of holidays!

Tuesday, December 22, 2009

A Merry Little Christmas

When I was working on sending out Christmas cards, I had to make a few extras and wanted to use some paper scraps from my bin that I couldn't let go to waste. You know how if they sit there for too long, you forget you have them? I love this paper, so I didn't want it to be forgotten in my stash! The paper is from the Merry Days of Christmas line from My Mind's Eye. I added some gold Stickles to the circles in the trees. The stamp set is the Jolly Ornaments set from Our Craft Lounge. I love how in some of the ornaments, there is a space for a sentiment to be stamped. So cute.

Well, I can't believe the end of this week is the big day! Christmas came so fast this year. I remember back in July when I had Isabelle, I thought "she'll be 5 months old for Christmas", but I also thought that was SO far away! Boy was I wrong! I hope your week goes smoothly and that you get everything done that you'd like to get done. :) Thanks for stopping by! SUPPLIES USED: Stamps- Jolly Ornaments (Our Craft Lounge); Ink- Tuxedo Black (Tsukineko), Riding Hood Red (SU); Paper- Merry Days of Christmas (My Mind's Eye); Accessories- circle and scallop circle punches (Marvy Uchida), ribbon (Darice), gold Stickles, paper piercer; Finished card measures 5.5"x4.25"

Saturday, December 19, 2009

Merry Christmas

I am loving playing around with the Holiday Button Bits set from Papertrey Ink. I just loved the little Santa and wanted to find a way to incorporate an ornament into a card so that the cutest little button Santa wouldn't go to waste! LOL So, I made the ornament by attaching gold ribbon in between pieces of cardstock. I didn't want to use a glue dot or anything like that in case it would tear the ornament when it was removed. I finally tried these photo corners and they worked perfectly. . .at least I hope so. I'm hoping they remained intact through the mailing process. :)


The card itself is very simple. A square of Scarlet Jewel cardstock to mount the ornament on, then two scored lines across the bottom of the card, made with my Scor-Pal. I made a couple extra ornaments to hang on our tree because I thought they were so cute. I'm even thinking about making ornaments with the other adorable images in the set. . . I know my girls would LOVE to help!

I just wanted to share one of my Christmas cards with you! I'm still working on sending cards out. I am really behind this year, but that is my goal for today. . .to get my remaining cards in the mail!

Hope you're having a wonderful weekend! We woke up to a BEAUTIFUL snow day! The snow is falling and adding to the few inches that fell over night. . .and we're inside a warm and cozy home watching from under blankets! That's my FAVORITE thing to do when it's snowing, and it's even better with kids! Savannah woke up this morning and rushed downstairs to tell me to look out the window. . .how precious! I do have to say that I'm glad I don't have to drive in it. Today is also the day that Santa comes through the neighborhood on the firetruck to "check" on all the kids. About 15 minutes before he "arrives", a police car drives through the neighborhood announcing that Santa's on his way! The kids get SO excited! Savannah thinks he might have to bring his sleigh today with all the snow we have! LOL Well, thanks for stopping by and have a wonderful weekend! SUPPLIES USED: Stamps- Holiday Button Bits (PTI); Ink- Onyx Black (Versafine); Paper- Scarlet Jewel, Kraft (PTI); Accessories- button (PTI), circle and scallop circle punches (Marvy Uchida), ribbon (Darice), photo corners; Finished card measures 5.5"x4.25"

Friday, December 18, 2009

Housewarming Gift

This past weekend, we had a housewarming party to go to and needed some special packaging! I thought the Home Made template from Papertrey Ink would be PERFECT! I decided to use the bricks that come in the Home Made stamp set. . .I LOVE how they turned out on the house! I filled the house with gourmet tea bags and a bottle of liquor to "enhance" the flavor of the teas! :) I needed a card to go with it and I just LOVED Nichole's card in THIS POST that she made with this set, so I just made a simplified, earthier version to go with the house.


Needless to say, the recipients LOVED the gift and couldn't believe I made the house! We won't tell them how easy it was, will we? LOL Thanks for stopping by and have a great day! SUPPLIES USED: Stamps- Home Made (PTI); Ink- Burnt Umber (Palette); Paper- Soft Suede (SU), Dark Chocolate, Scarlet Jewel (PTI); Accessories- Choc. Chip ribbon (SU), Ivy punch, branch punch (Martha Stewart), brad (Making Memories), button (PTI)

Thursday, December 17, 2009

Bananas Over You!

Here's a fun little card using the Jungle Love set from Our Craft Lounge. This monkey is just too cute and a lot of fun to color! I used some of the Bloom & Grow Collection from My Mind's Eye paired with Dark Chocolate and some Prism paper. I colored the image using my Copics and cut it out with the Labels Nine Nestabilities. This is such a great set for kids. . .mine love it and manage to swipe every card I make with it! LOL

Thanks for stopping by today. Hope you're having a great week! SUPPLIES USED: Stamps- Jungle Love (Our Craft Lounge); Ink- Whisper White craft (SU); Summer Sunrise (PTI), Tuxedo Black (Tsukineko); Paper- Bloom & Grow Collection (My Mind's Eye), Suflower Medium (Prism), Dark Chocolate (PTI); Accessories- button (PTI), hemp, Labels Nine Nestabilities (Spellbinders), Copic markers; Finished card measures 5.5"x4.25"

Wednesday, December 16, 2009

Center of Attention Product Spotlight - TE Downloads

This month's Product Focus at Taylored Expressions is their Downloads. There are a variety of downloads available from calenders to binder box inserts to recipe cards! That is what I have to show you today. I am using the new Recipe Cards designed by Nancy McKinney. They are formatted both vertically and horizontally depending on your preference. My preference is horizontal, so that's what I'm using. All you have to do is decide which format you'd like and print them out onto the color cardstock you'd like! I used Choice Snow White. Two recipe cards print onto one 8.5"x11" piece of cardstock, so all you have to do is cut the paper in half to have your two recipe cards. They fit PERFECTLY in the Mini Binder Boxes, or you can choose to bind them with your Bind-It-All or similar system. I've used one of the Mini Binder Boxes for my recipe cards. What I like about using the box is that it snaps closed AND the cards are also attached by three rings, so the cards won't fall out of the box (like my current recipe box with index cards). I love that the shaded boxes for ingredients and directions are all printed up for you, so all you have to do is write your ingredients and directions. . .easy peasy! What's even nicer is that, I only have to print out cards as I need them! I don't have to have a stack of recipe cards sitting waiting to be written on. . .like I do with my index cards. You can decorate these with stamps or any way you like too! I like having pictures of what I'm making, so I've added these pictures to my recipe cards. I have pictures of my chicken dip and taco dip because they are two things I make all the time! They are my go-to recipes for taking to parties where an appetizer is needed.


Each of our Center of Attention products will be on sale for a limited time(December 16-17). Taylored Expressions will be offering a 15% discount on all TE Downloads! The best part is...there are no shipping charges for the downloadable items!
To see the other downloadable items and for ideas using them, visit these members of the Baker's Dozen:

Thanks for stopping by today and have a great day!

Tuesday, December 15, 2009

Friend

Here's a card made using one of the newest releases from Taylored Expressions, Sweet Occasions. I think this set is just adorable! It's a lot of fun to color too! I used some left over paper from my Bloom & Grow Card Kit to create this card. I kind of like the heart in non-traditional colors! I also used TESC94 for my card.

On a personal note, we just returned from Arwen's preschool Christmas Pageant. It was adorable! She was so excited to be up on stage performing for us. . .too cute! It was a bummer that Savannah couldn't see it since she is in school herself. It wasn't so long ago that Savannah was up there just like Arwen. My does time fly! Okay, hope you're having a great day! Thanks for stopping by! SUPPLIES USED: Stamps- Sweet Occasions (Taylored Expressions); Ink- Tuxedo Black (Tsukineko); Paper- Bloom & Grow Collection (My Mind's Eye), Prism Papers; Accessories- Copic markers, white gel pen; Finished card measures 4.25"x5.5"

Monday, December 14, 2009

LOVE

I was just playing around with one of the new templates that will be released by Papertrey Ink tonight at midnight. This is one of the Be My Valentine In Shape Collection templates designed by Kim Hughes. I was busy printing out the picture I'll be sending in our Christmas card this year and all of the sudden a lightbulb went on! I thought "I wonder how this picture would look if I used the All You Need Is Love template?" So I decided to try it. I think it turned out pretty cool. It would be especially cool for people who know my kids. . .they wouldn't feel like they were missing parts of their faces. LOL I do think it's very cool how it came out, even though parts of faces are missing. The overall concept is there, right? I just wanted to share with you a "different" idea for using this template. . .and no stamping! Hope you like it!

Shiny & Bright

Today I have a nice and shiny card for you! I really liked the sketch on the Clean & Simple Stamping blog, Fall To Layout #72. I thought it would work well with the Jolly Ornaments set from Our Craft Lounge. I also used some non-Christmas paper for this card that I think works well for Christmas! It's the Indian Summer Fall Stack from Die Cut With a View. I just LOVE all the colors in this paper. I paired it with some Rich Razzleberry cardstock for this card. The non-colored ornaments are covered with Gold Stickles. The Rich Razzleberry piece of cardstock was embossed using the Candy Cane Stripe Cuttlebug folder.

Thanks for stopping by today! Hope your week is off to a great start! SUPPLIES USED: Stamps- Jolly Ornaments (Our Craft Lounge); Ink- Tuxedo Black (Tsukineko), Rich Razzleberry, Crushed Curry, Bermuda Bay (SU); Paper- Indian Summer Fall Stack (DCWV), Rich Razzleberry (SU), Ripe Avocado (PTI); Accessories- Gold Stickles, Candy Cane Stripe Cuttlebug folder (Provocraft); Finished card measures 5.5"x4.25"

Friday, December 11, 2009

Weekend Sketch Challenge #110


It's time for another Weekend Sketch Challenge! This week's sketch is being hosted by Lori, so head on over to her blog to post your link if you play along. . .and we hope you do!

For my card today, I used an older Verve set called Beautiful Kindness. I stamped the butterfly image in Versamark onto black cardstock and then embossed with black embossing powder. I loved the tone-on-tone look. . .especially when the embossed butterfly is shiny. It makes it more elegant, don't you think? Don't know if you can see it in the picture, but the black piece of cardstock in the background is dry embossed with large polka dots. I used the Polka Dots QuicKutz folder for that. The focal piece was die cut using the Labels Four Nestabilities.


For more inspiration using this sketch, visit Cami, Jenn, Lori, and Sharon! Thanks for stopping by today and have a fabulous weekend! SUPPLIES USED: Stamps- Beautiful Kindness (Verve Stamps); Ink- Onyx Black (Versafine), Versamark; Paper- Riding Hood Red, Basic Black (SU), Kraft (PTI); Accessories- black embossing powder, paper piercer, Labels Four Nestabilities (Spellbinders), ribbon (Darice), Polka Dots embossing folder (QuicKutz); Finished card measures 5.5"x4.25"

Thursday, December 10, 2009

"Be My Valentine" Sneak Peek

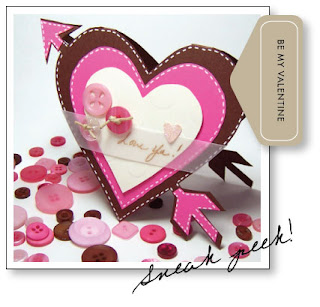
I've got a sneak peek for you of a template from the brand new template library, Click Simple from Papertrey Ink! This is just ONE of the FOUR templates that come in the Be My Valentine template package, designed by Kim Hughes! This is the Heart and Arrow card.

When I first saw this template, I immediately thought of Valentines that I used to create in grade school. You know, the ones where you’d fold the construction paper in half and cut your heart out to form your card. This template makes it so much easier since you have perfect lines to follow with the scissors! It’s also great because you can print the heart outlines and stitches in whatever size you need for layering. The arrow is a nice added detail for that something extra. This makes a great “everyday” kind of card as well as a Valentine. My daughter already wants me to print some out for her to cut out and make her own cards! I can’t wait to see her interpretation. :) Complete instructions & supply lists for this project will be provided in the companion idea download that comes with the template and will be available for purchase on December 15th.
For more Sneak Peeks, head over to Nichole's blog, and see more template peeks over at Kim, Laurie, Geny, & Jennifer's blogs!

Tuesday, December 8, 2009

Thanks!

Here's a simple little card using one of the latest Verve releases, Celebration of Thanks. I also used one of the K&Co. ladybug stickers that Julee sent me a long while ago. I've hoarded them for so long because I couldn't bear to part with them! LOL They are adorable, though and I just LOVE them!

For this card, I also used the Stripes QuicKutz folder for the bottom portion of the card. It's great for adding a little texture and interest to a simple card. Thanks for stopping by today! Hope you have a great day! SUPPLIES USED: Stamps- Celebration of Thanks (Verve Stamps); Ink- Onyx Black (Versafine); Paper-white (Georgia-Pacific), Bitty Dot Basics, Summer Sunrise (PTI); Accessories- Swiss Dots ribbon in Summer Sunrise (PTI), ladybug sticker (K&Co), Stripes embossing folder (QuicKutz); Finished card measures 5.5"x4.25"

Friday, December 4, 2009

Taylored Expressions RELEASE DAY!

It's here! Release day at Taylored Expressions! Today we're featuring a new item at Taylored Expressions that we think you'll really like! Have you noticed there haven't been any Key Ingredients for these stamp sets? That's because today, we're showing you the NEW Taylored Card Kits! Each Taylored Card Kit features coordinating patterned paper, cardstock, ribbon, and Kaisercraft pearls... everything you need to make a set of coordinating cards right down to the packaging! That's right! The kit even comes with a Perfect Package Card box and envelopes!


My set features the Bloom & Grow Card Kit. This kit works beautifully paired with the Discover Your Wings stamp set. I've created a set of 10 cards to go in my Perfect Package, decorated the Perfect Package and STILL have paper, ribbon and pearls left over! There really is A LOT in the kit and for a great price of $14.95!! We think you'll love these kits. There are 3 to choose from and each have a coordinating Copic Kit available!


Come blog hoppin' with me to see what the
Baker's Dozen girls have cooked up with the Taylored Card Kits today.

Be sure to leave some love along the way because one lucky commenter will win a Crafty Cuppie stamp set! How cool is that?All you have to do is leave a comment on each Baker's Dozen blog today for the best chance to win! One lucky winner will be chosen at random from all of the comments on one of the blogs, but the trick is that nobody knows which blog it will be! You have until 6am PST on Saturday to enter. The winner will be announced Monday morning on Taylor's blog.

Weekend Sketch Challenge #109

It's Friday and time for another Weekend Sketch Challenge!


For my card today, I used the Jolly Ornaments set from Our Craft Lounge. The different ornaments and and sentiments in the set are just adorable. I had to add that strip of paper for the sentiment, though, since the patterned paper was a little too busy. The sentiment got lost. :)


Be sure to stop and see the fabulous creations of Beate, Jenn, Laurie, Lori, Mary Jo and Sharon for more takes on this sketch! Thanks for stopping by and have a wonderful weekend! SUPPLIES USED: Stamps- Jolly Ornaments (Our Craft Lounge); Ink- Onyx Black (Versafine), Riding Hood Red (SU); Accessories- ribbon (Darice), circle and scallop circle punches (Marvy Uchida), paper piercer, Self-Adhesive rhinestones (Zva Creative); Finished card measures 5.5"x4.25"

Thursday, December 3, 2009

Taylored Expressions Sneak Peek - Day 2

Here we are with another day of sneak peeks for the new release at Taylored Expressions! Today you'll be getting peeks of two different sets. Half of the Baker's Dozen is featuring the Sweet Occasions set, and half of us are featuring Crafty Cuppie! Make sure you visit everyone to catch all of the peeks!


The Crafty Cuppie set is just adorable and perfect for lots of my friends and family. For today's project, I decided to create a little package for my girls. Savannah and Arwen are always wanting to create something whether it be a picture to color or something to make out of PlayDoh. One of their favorite crafts is stamping! (big surprise, huh?) They have their own stamp box filled with different stamps I've picked up here and there. For a while, I was collecting the Studio G clear stamp sets I'd find in Michael's and Joann's. I really never got around to using them, but they were always so cute and I bought every set I liked. I thought I'd put together a nice package for the girls complete with new stamps and bits and pieces of ribbon and other embellishments I've had in my stash. I even put a couple of ink cubes in there. I know they've love having new stamps to use, and the ribbon will be an added bonus since I don't often let them touch my ribbon! LOL

I think this Cuppie with all the stamping gear is my favorite image in the set. I colored the image with Copics and added some Dazzling Diamonds glitter on the glitter in the jar, and even though you can't really tell in the picture, the embossing gun is partially colored with Silver Fox Smooch for a real metal look! On top of the paint can, I stamped the sentiment " Do something creative everyday!" For the card, I used the sentiment "Inky Hugs", which I LOVE! I know the girls will be thrilled with this package. . .I just can't decide if I should give it to them now or use it as a stocking stuffer for Christmas!

Come blog hoppin' with me to see what the Baker's Dozen girls have cooked up today.

Crafty Cuppie

Sweet Occasions
All you have to do is leave a comment on each Baker's Dozen blog today for the best chance to win! One lucky winner will be chosen at random from all of the comments on one of the blogs, but the trick is that nobody knows which blog it will be! You have until 6am PST on Friday to enter. The winner will be announced Friday morning on Taylor's blog.

Wednesday, December 2, 2009

Taylored Expressions Sneak Peek - Day 1

It's time again for another release from Taylored Expressions and wait to see what we have to show you this month!

Every 3 months Taylored Expressions introduces a new set in the TE Giving Tree Program. Each set supports a different charity for 3 months after release. The newest set in the TE Giving Tree Program is Discover Your Wings designed by Nancy McKinney. This set will be available for purchase Friday December 4th at 8:00 am PST. I just LOVE the TE Giving Tree Program. Taylor always finds wonderful charities to support through the sales of these stamp sets. This quarter's set, Discover Your Wings, will help support the Now I Lay Me Down to Sleep Foundation. The Now I Lay Me Down to Sleep Foundation is a charity that administers a network of almost 7000 photographers in the US and 25 other countries who volunteer their time to gently provide a helping hand and healing heart to families who have suffered the loss of an infant by offering gentle and beautiful photography services in a compassionate and sensitive manner. NILMDTS is there for parents and families to help them in their healing, bring hope to their future, and to honor their child. They believe that it is through remembrance that a family can truly begin to heal. Taylored Expressions is honored to help support the work of this wonderful charity. I encourage you to go to their website and learn more about their wonderful work.


I never knew this charity existed until now. I wish I had as my sister had a stillborn daughter nine years ago. The Now I Lay Me Down to Sleep Foundation does beautiful work! When you go to the website, make sure you have tissues with you. . .the photographs are absolutely beautiful and so very touching. $7 from the purchase of each Discover Your Wings set will be donated to this amazing charity.


I created a card set that I could give as a gift. I cut down an acetate box to make a clear card purse. For the handle (which you can hardly see in the first picture) is made from cutting a strip of acetate from an 8.5"x11" sheet. The handle measurements are 1"x11". I attached it at either end with glue dots. It makes for SUPER SIMPLE and fast packaging. . .and it shows off your cards since you can see through it! No decorating the box needed! I used the Blue Hill Collection from Crate Paper for the cards.


Come blog hoppin' with me to see what the rest of the Baker's Dozen have cooked up with Discover Your Wings today.


Be sure to leave some love along the way because one lucky commenter will win a Discover Your Wings stamp set! How cool is that?All you have to do is leave a comment on each Baker's Dozen blog today for the best chance to win! One lucky winner will be chosen at random from all of the comments on one of the blogs, but the trick is that nobody knows which blog it will be! You have until 6am PST on Thursday to enter. The winner will be announced Friday morning on Taylor's blog.

Tuesday, December 1, 2009

Best Wishes

It's time for another Flower Soft challenge and my last day with the Flower Soft team. I have really enjoyed using Flower Soft and my time on the team!

The theme this month was Christmas. I used one of the Cute Christmas Die Cut Sentiments for my card. I covered the wreath with Vintage Christmas Flower Soft. . .my favorite! I used the Holly Ribbons Cuttlebug folder for the background and some pretty red ribbon for a big bow.

Be sure to check out what gorgeous creations the rest of the design team has to show you today!

Jennifer
AJ
Deb
Barb
Jeanne
Sharon

Thanks for stopping by! SUPPLIES USED: Cute Christmas Die Cut Sentiments, Vintage Christmas Flower Soft (Flower Soft), Holly Ribbons Cuttlebug folder (Provocraft), ribbon (Darice); Finished card measures 4.25" square

Monday, November 30, 2009

Believe

I just LOVE the Holiday Button Bits set from Papertrey Ink. I just love all of the adorable images, and this round little Santa is one of my favorites. How cute is he?

I stamped the Santa twice onto Kraft cardstock in Tuxedo Black ink. I colored one full image and then just the head on the other. I attached the button to the fully colored image and then cut out just the head from the other image and attached it over the first image and button. I used the plain and scallop oval punches from Stampin' Up for the sentiment.

Thanks for stopping by today! Hope your week is off to a great start! SUPPLIES USED: Stamps- Holiday Button Bits (Papertrey Ink); Ink- Tuxedo Black (Tsukineko), Whisper White Craft (SU); Paper- Scarlet Jewel, True Black, Kraft (PTI), gold (DCWV); Accessories- oval and scallop oval punches (SU), circle punch (SU), Scallop circle punch (Marvy Uchida), button (PTI), embroidery thread, Copic markers, white gel pen; Finished card measures 4.25" square

Friday, November 27, 2009

Verve Thankful Hearts Blog Hop

It’s new release time at Verve and we’re topping off our Thankful Hearts Blog Party with a blog hop featuring three new sets that just released, all focused on thankfulness. If you’ve been hopping and arrived from Lynda’s blog, then you’re right where you should be. If you’ve just happened by, then you’ll want to hop on over to Poetic Artistry to start from the beginning! And to make this hop even sweeter, we’ve got a special treat hidden along the way for one lucky commenter. So if you see something that makes you smile, be sure to give a little shout-out in the comments for a chance to win our entire release!


For my card, I used the 1 Corinthians 15:57 Plain Jane being released tonight. I used some Penny Lane paper from My Mind's Eye along with my Labels Seven Nestabilities. I thought the "book" look would go well with a verse. Hope you're loving all the new stuff you're seeing from Verve! I know I am!
Thanks for hopping by! Next up on the hop is Jen Tapler.

LinkWithin

Related Posts with Thumbnails