Showing posts with label 3D Items. Show all posts

Monday, January 26, 2015

Chick Treat


I have a cute little project to share today.  My project was inspired by this adorable project on Pinterest by Kendra Wietstock.  I was inspired by the fact that it was a 3D treat, but also that it was made of acetate!  I loved the "see-through" look of the treat, so I looked at my Sack It Dies from Taylored Expressions and the candy in the cabinet to see what I could come up with!  :)


When I found Lemonheads in the kids' Halloween candy, I decided to create a little chick using the Sack It To You Die along with the Sack It - Chick.   I thought it worked well!  The container was die cut out of Clear Plastic Sheets.  The Lemonheads "color" the body of the chick yellow, and I just had to die cut yellow wings, the little hair sprout and then of course the eyes, beak, belly and feet.  Those were die cut using Lemon Meringue, Oreo, Pumpkin and Sugar Cube.

I tied the cello bag with some Baker's Twine.  I think it turned out cute!  Hope you've been inspired!  Thanks for stopping by today!

SUPPLIES USED:


Friday, October 11, 2013

Halloween Treats


I'm always trying to come up with new ideas for classroom treats for my kids.  I wanted to create something using the Cupcake Wrap from Taylored Expressions.   I decided it would pair perfectly with the Totally Tags: Halloween set!!

So, I created the little "cupcake" using the Cupcake Wrap and actually put cupcake liners in there.  Instead of filling them with batter, I put a little "spooky green filler" in there and put little Halloween treats like bubbles, erasers and bat rings.  You can even put little candies in there, but our schools have a no food treat policy, so Halloween erasers, rings and bubbles fit the bill!!

They are super simple to make and the cupcake liner stays in the cupcake wrap perfectly!  I stamped the images from Totally Tags: Halloween and die cut them with the coordinating Totally Tags Dies and adhered them to the fronts of the "cupcakes". 

I hope I've inspired you with a different way to use the cupcake wrap if you're just not in the mood (or don't have time) for baking!  Thanks for stopping by and have a wonderful weekend!!

SUPPLIES USED:


Sunday, August 25, 2013

Birthday Treat


I was playing around with products from the newest release at Taylored Expressions and I came up with a cute idea for little birthday favors!  :)  I started with the "birthday treat" image from the Classroom Cuties set.   I stamped the image and colored it with Copic markers, then punched it out with a circle punch. 

I used papers from the Sweet Girl Collection from Echo Park.  I die cut the topper base using the Scalloped Notecard Die.  I cut the patterned paper to fit the folded notecard, tied some ribbon and then added the stamped image on top.  Next, I filled a little cello bag with some filler and little nail polishes.  I found these nail polishes that came as a four pack in the dollar bin!  As most of you know, my kids have food allergies, so I try whenever possible to use something other than food/candy as a treat.  These little nail polishes were the perfect thing!  After I filled the bag, I folded it over and stapled the top.  I put some Sticky Tape along the bottom inside edges of the notecard and closed the bag in between it.  Perfect little treat, all ready to go!!

For the little banner that is on the cake. . .I thought that would be the perfect place to write the names of the little girls they were for.  Thanks for stopping by today!  Have a great day!!

SUPPLIED USED:


Thursday, June 6, 2013

Taylored Expressions June Release Day: Pinking Circle Stacklets


 It is RELEASE DAY!!  Everything that you've seen featured these last few days is NOW AVAILABLE in the TE Store!!  I hope you've enjoyed what you've been seeing this week!  Today I have a project for you featuring the Pinking Circle Stacklets. 

I decided to create a little appreciation box.  It can be filled with a little gift or just used as a center piece, I thought.  I created the box using the 2-5-7-10 Box Tutorial on Splitcoaststampers.  The papers are from the Patriotic Project Pantry.  I used Distress Markers to color the stamp from Stars & Stripes with Coordinating Die.  I die cut the image and then stamped "God Bless the USA" in black over top.

After putting white filler in the box, I created the circles using the Pinking Circle Stacklets and some wire so that they would peek out of the box at different levels.  I decorating the pinking circles with buttons and some ribbon and stamped the thank you sentiment from the set on the biggest circle.  I have to say that the Pinking Circle Stacklets are my new favorite dies!!  I can't stop using them!  LOL

The rest of the Baker's Dozen has more to show you today!!  Please stop by their blogs for some eye candy and HAPPY SHOPPING!!

Carole Burrage
Charmaine Ikach
Jami Sibley
Jen Shults
Joan Ervin
Kerri Michaud
Nancy McKinney
Sankari Wegman
Shannon White
Shelly Mercado
Stephanie Kraft
Tammie Edgerton
Taylor VanBruggen
Wanda Guess


Thursday, February 14, 2013

Happy Valentine's Day!!

 
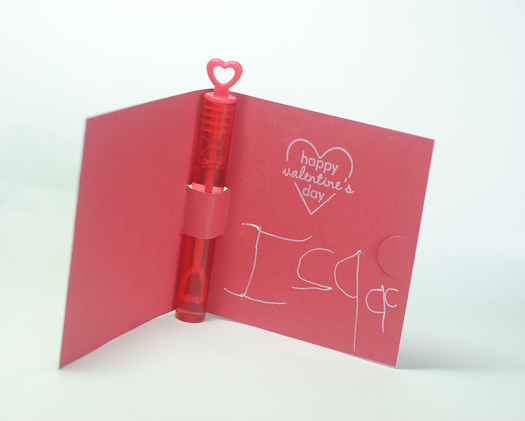
 Well, the Valentines are all made and taken to school, ready to be passed out!  It is nice to finally have that project completed!!  I thought I'd share with you the Valentines my kids made.  First up is my son, Isaac.  I pretty much created the whole thing.  He just signed his name on the insides.  :)  In preschool, they don't want you to address each Valentine because it just slows down the whole process of the children passing them out!  :)  I went with the chalkboard technique for my Isaac's Valentines.  I thought it would be simple.  I used the dinosaur from the Tremendous Treats:  Valentine set from Papertrey Ink.  I found these little valentine bubbles at Target, so I created a little card that would hold the bubbles inside.

All I did was cut two slits in the crease of the card.

Then I opened the card and reversed the portion between the two cuts to fold inside the card and then inserted the bubbles.  Simple!

My two daughters, however, wanted to do their own Valentines.  They were fine with mom making the actual card and stamping, but they wanted to color and assemble.  :)

Arwen created her cards using two of the monsters from the Love Monsters set from Taylored Expressions.  After she colored her monsters, we added one googly eye to go with the sentiment.  ;)  I love how the one monster ended up looking like he was giving a big wink.  lol
 In 1st grade, they bring home their class list and are expected to address each Valentine.  So, Arwen signed her name on the inside and addressed them on the back.
Savannah used the same set Arwen did, but she wanted to use different monsters and one different sentiment.  She chose the I {heart} U sentiment for the girls and "I only have eye for you" for the boys.  As you can see from her coloring, she added hair, bling and all sorts of extras!  :)
I hope you have a special Valentine's Day!  Thanks for stopping by!!


Saturday, December 29, 2012

Ornaments


I hope you all had a wonderful Christmas!!  We did!  Very busy with a touch of chaos, but good!  :)  I haven't been able to post for a while with all of the holiday activities and the kids all being home, so I have a little post that was something I created before Christmas.  I was helping with my oldest daughter's Christmas party at school and I was in charge of the craft.  They all created these adorable little mitten ornaments. 

I used the mitten die from Spellbinders along with some chipboard. . .a.k.a. cereal and cracker boxes from the kitchen to create the mitten.  The gingerbread and sentiment are from the Holiday Button Bits set along with the Holiday Button Bits Die Set from Papertrey Ink.  I was inspired by the card I made HERE.  I used Pure Poppy cardstock and some patterned papers from the Handmade Holiday Collection from Simple Stories. 

The ivy leaves were created with the Holly Jolly Die Collection.  I strung some jingle bells onto the jute and added some buttons to the gingerbread.  The kids LOVED making the ornaments.  I ended up making a few extras to use as tags on gifts.  They really dressed up little bags of sweets! 

Thanks for stopping by today!  Hope you're getting some crafty time in as well as LOTS of family time!  I'll check in again soon!


Wednesday, October 10, 2012

TE October 2012 KI Release


Welcome to the TE's October Key Ingredients hop!!  I know you've heard me talk about the Key Ingredients Subscription before.  I absolutely LOVE it.  I have been a subscriber for a LONG time and I still love receiving different "in" patterned papers each month with coordinating cardstock and embellishments.  There are enough supplies in each kit to create at least 16 cards, and there's no thinking involved!  Everything is right there for you!  If you don't like digging through your "stash" looking for the right paper, embellishment or ribbon for a project, then you will LOVE the Key Ingredients Subscription. 

This month is even more special.  There is a subscriber exclusive!  TE is offering an adorable stamp set, Falling For You, and its coordinating die set to Key Ingredients Subscribers only!  What's more is that you can purchase the stamp set at 50% OFF only through 11/10/12.  On 11/11/12 the price will return to regular retail of $23.95.  The Falling for You Stamp Set and dies will be available throughout 2012. 

For my project today, I created a little treat using a Little Bitty Bag.  I stamped, paper pieced and die cut the apple from the Falling For You set using patterned papers from the October KI Kit.  I stamped the sentiment and made it into a banner and adhered it across the apple.  The belly band was created using a banner-like piece of the patterned paper from the kit.  I colored in the outside rim of the apple to give a little dimension and frayed a piece of the burlap from the kit to create the little bow on the apple. 

  • Key Ingredients Info and Inspiration – October 10-15 - learn all about this fantastic kit club and see samples from the Key Ingredients Design Team and the Baker's Dozen! Click here for all the info.
  • October Key Ingredients featuring Simple Stories Harvest Lane 6x6 papers begins shipping October 15th. Enroll now!
  • Exclusive Falling for You Stamp Set & Coordinating Dies- find out how you can get your crafty little hands on the adorable new stamp set at 50% off for a limited time! Click here!

  • Please hop around to see what the rest of the team has created with this month's Key Ingredients Kit!!

  • Debbie Carriere
  • Jen Shults
  • Monika Davis
  • Regina Mangum
  • Sankari Wegman
  • Shannon White
  • Shelly Mercado
  • Stephanie Kraft
  • Taylor VanBruggen
  • Tracy Clemente


  • LinkWithin

    Related Posts with Thumbnails