Friday, May 28, 2010

Life is Better When It Sparkles


I love when Fridays come along. . .especially when there's a long weekend!  I especially love when there's a new Viva la Verve Challenge and I can participate!  This week's challenge was perfect for the holiday weekend with the inspiration pic that I chose.  :)
I used the Starlight Starbright and Swirly Stars sets from Verve.  I used the Pajama Stripe Cuttlebug folder for the cream background and even the Scor-Bug on the brown piece of cardstock. 


There's a Memorial Day SALE at Verve this weekend, so head on over and check it out!  If you're looking for some stamping inspiration, try out the Viva la Verve Challenge!  Thanks for stopping by and have a fabulous holiday weekend! 


Thursday, May 27, 2010

I {heart} Summer

School is almost out, the weather has been absolutely beautiful here. . .I am SO excited that summer is almost here.  Summer is my favorite season.  :)  Here is a card I made using the Garden Party Blooms set and the Cloudy Days Background stamp from Taylored Expressions.  The sentiment is from the Garden Party Project Pantry cardstock stickers. 
I stamped the cloudy background onto textured cardstock.  I stamped and cut out the sun and punched a scalloped border.  The ribbon is from the Garden Party Project Pantry kit as well as the patterned paper and cardstock.  Finally I added a rhinestone border from Zva Creative


Thanks for stopping by and have a wonderful day!  SUPPLIES USED:  Stamps- Garden Party Blooms (Taylored Expressions); Ink- Hawaiian Shores (PTI); Paper- Garden Party Project Pantry (TE); Accessories- ribbon, cardstock sticker from Garden Party Project Pantry (TE), rhinestones (Zva Creative), scalloped border punch (EK Success);  Finished card measures 5.5"x4.25"

Tuesday, May 25, 2010

Papertrey Ink May Blog Hop Challenge


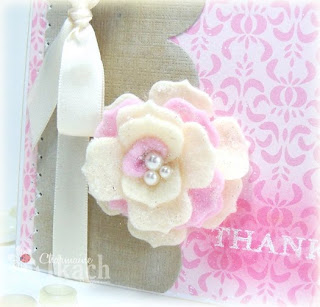
It's time for the Papertrey Ink May Blog Hop Challenge!  This month's challenge was all about felt!  I, personally, don't use felt very much, so this was a nice challenge for me.  I decided to use my felt to create a flower just like I did on this card with the coordinating Beautiful Blooms II stamp and die. 
For this card, I used the largest flower in the Beautiful Blooms II #1 die collection and cut two flowers out of Vintage Cream Felt and 1 flower out of pink felt that I had.  After assembling the flower, I used a spray adhesive on the flower and dunked it in glitter.  I added 3 pearls to the center as a finishing touch.  The card uses Pretty Pastels paper along with Kraft that I embossed using the Linen & Canvas Impression Plate.  I rubbed Fresh Snow ink on the edges of the Kraft cardstock.  The sentiment is from the Giga Guidelines set.  I stamped and embossed in white and then rubbed Hibiscus Burst over the sentiment to make it stand out more.  I also cut some Vintage Cream felt with the Large Scalloped die and just cut off one of the scallops to use as an accent on the right side of the card. 


Hope you can hop along and see everyone's creations using felt!  I'm excited to see everyone else's ideas!  Thanks for stopping by!  SUPPLIES USED:  Stamps- Giga Guidelines (PTI); Ink- Fresh Snow, Hibiscus Burst (PTI); Paper- Pretty Pastels, Kraft (PTI);  Accessories- Large Scalloped Border, Vintage Cream felt, Vintage Cream ribbon, Beautiful Blooms II#1 die (PTI), pink felt, pearls (Kaisercraft), paper piercer, white gel pen;  Finished card measures 4.25"x5.5"

Sunday, May 23, 2010

With Gratitude


Sometimes it's nice to put together a card with scraps. . .not cutting into a brand new sheet of cardstock or patterned paper.  I was trying to clean off my work area and decided to use some of the scraps that were there.  I used the Background Basics: Woodgrain stamp set from Papertrey Ink in Simply Chartreuse ink on the Kraft cardstock.  I also used the new Linen & Canvas Impression plate on the piece of Kraft cardstock.  It really gives more of a rustic, woodgrain look to the paper!  I used the Round & Round set for the focal image, which was the anniversary set this year.  I stamped the image in Berry Sorbet ink onto Sweet Blush cardstock.  I stamped it again in Simply Chartreuse ink onto white cardstock and then just cut out the leaves and attached them to the Sweet Blush image.  I added Stardust Stickles over top.  I used the Mat Stack 2 die on white cardstock.  Then I stamped the frame image from Round & Round onto the die cut piece.  The Sweet Blush piece is mounted on the white die cut piece with dimensional adhesive.  The last little touch was the Large Scalloped Border die with some cream cardstock.  I also distressed that piece with some cream ink. 

Thanks for stopping by today!  Have a wonderful Sunday!  SUPPLIES USED:  Stamps- Round & Round, Background Basics: Woodgrain (PTI); Ink- Simply Chartreuse, Berry Sorbet, Sweet Blush (PTI); Paper- Pretty Pastels, Kraft, Sweet Blush (PTI); Accessories- Linen & Canvas Impression plate, Mat Stack 2 die, Simply Chartreuse ribbon (PTI), Stardust Stickles;  Finished card measures 4.25"x5.5"

Friday, May 21, 2010

Love Ya Dad


It's Friday and time for another Our Craft Lounge Design Team Sketch!  I flipped today's sketch for my card.  I used the Fishing With Dad set from Our Craft Lounge.  I used the Pajama Stripe Cuttlebug embossing folder for the background and the Labels 8 Nestabilities for the dotted panel behind the image. 

We hope you'll play along with the sketch!  Thanks for stopping by today and have a wonderful weekend!  SUPPLIES USED:  Stamps- Fishing With Dad (OCL); Ink- Burnt Umber (Palette); Paper- Dark Chocolate (PTI), Prism Papers;  Accessories- Pajama Stripe Cuttlebug folder (Provocraft), Labels 8 Nestabilities (Spellbinders), Circle and scallop circle punches (Marvy Uchida), paper piercer, twill and Choc. Chip marker (SU);  Finished card measures 4.25"x5.5"

Thursday, May 20, 2010

Sending You Smiles


Here's a card using Fall To Layout 90 from the Clean & Simple Stamping Blog.  I used the Sensational Stems set from My Time Made Easy and a Verve sentiment from the Thoughtful Florals set (still one of my absolute favorites).  You know when I saw this ladybug, I HAD to have this set!  LOL  What's so great about this set is that the ladybug pieces also make a flower!  How cool is that? 

Thanks for stopping by today!  Hope you're having a great day!  SUPPLIES USED:  Stamps- Sensational Stems (MTME), Thoughtful Florals (Verve); Ink- Tuxedo Black, Rose Bud, New Sprout (Tsukineko); Accessories- Tiny Twinkles (Taylored Expressions), ribbon (Papertrey Ink), paper piercer, corner chomper;  Finished card measures 4.25"x5.5"

Wednesday, May 19, 2010

A Cheerful Friend

Today I have a card to share using the Treasured Friend set from Our Craft Lounge.  I'm really loving the images in this set.  You can stamp and color them, or you can use them as silhouette-like images like I did here.   I also love how the girl images in the set are separate.  You would think they were part of the frame image, but they're not, which makes this set more versatile.  Thanks for stopping by today!  SUPPLIES USED:  Stamps- Treasured Friend (OCL); Ink- Onxy Black (Versafine), Potter's Clay (Memento); Paper- Garden Variety (Cosmo Cricket);  Accessories- ribbon (Darice), Dew Drops (The Robin's Nest), circle and scallop circle punches (Marvy Uchida), Scallop and  Scalloped Scallop dies (My Favorite Things); Finished card measures 4.25" square

Monday, May 17, 2010

Sizzlin' Summer Fun!


Today the May Project Parade started over on the Verve Blog.  This month's theme is Sizzlin' Summer Fun

I'm kicking it off today with an idea I had for a kid's pool party or beach bash favor! When I was thinking about Summer and what my kids love, one of the first things that came to mind was Capri Sun. My kids would drink Capri Sun all day everyday if I let them! I recently got this Pucker Up template from My Time Made Easy and I thought it looked like a Capri Sun, so I thought I'd fill it with some Starburst, Kool-aid, swim googles, chapstick and even a fun, crazy straw for a party favor!


I used the Relax and Happy Days sets from the latest release to mimic the look of a Capri Sun. I sponged some color on the panel and then stamped the palm tree. I added some Dew Drops for coconuts and tore some Kraft cardstock for the sand. The sun and surf boards were stamped on pieces of scrap cardstock, cut out and attached to the favor. I punched a hole in the top of the box to add the crazy straw.


We'd LOVE for you to play along!  Be sure to head on over to the Verve Blog and add a link to your project on the Mr. Linky in THIS post to be eligible to win some Verve goodness!  Also, leave a comment on each of the days of the Project Parade for the Verve Divas and one lucky commenter will be chosen to win some Verve as well!  Can't wait to see what Sizzlin' Summer Fun you create! 
 

Happy Father's Day

When I looked at the Our Craft Lounge Design Team Sketch this past Friday, I didn't know what I was going to do with it.  I wanted to try and stay away from flowers on the main panel just for something different.  I decided to use the Fishing With Dad set.  I thought the independent little images would work well for the sketch.  I gave a hint of color to the images with some Copic markers and added a couple of Dew Drops in the bottom left hand corner.  Nice and simple. . .and perfect for dad. 

We'd love for you to play along in the OCL Design Team Sketch on Fridays!  You could win some free stamps!   Thanks for stopping by and have a wonderful day!

Saturday, May 15, 2010

Taylored Expressions May Key Ingredients

It's time again for a Key Ingredients Subscription post at Taylored Expressions!  This month's Key Ingredients subscription contains Pebbles Treehouse patterned paper with coordinating rub-ons, ribbon and chipboard.  Taylor challenged the Baker's Dozen to create one project without stamping. . .only using the contents of the kit, and another project using stamping and elements from the kit to accent the stamped project. 


My first project is a journal set.  My 6 year old LOVES journals.  She has always wanted to get a new journal anytime we've seen a cute journal in the store.  I've always picked up $1 journals here and there for her.  She writes and draws in them constantly and I love to go back to her earlier journals to reminisce about how little she was!  :)  Now that she's actually writing, I just LOVE to get a "peek" into her head!  :)  So, I thought she would LOVE a journal that I actually altered for her. 


In my stash, I found a journal that I bought at a dollar store a few years ago.  They had wooden covers and a square cutout in the front.  I always intended to alter them, but never got around to it.  I thought this would be perfect for using the chipboard owls.  I inked up both owls with ink to "cover" them.  I cut pieces of yellow and white paper from the kit to adhere behind the eyes and beak. 


For the journal, I covered the inside front cover with patterned paper so that from the front, there would be some dimension between the owl and the birdhouses. 


The bookmark is especially for my daughter. She LOVES these bookmarks that have the magnet inside so that when closed, it "hugs" the page and doesn't fall out. 


I designed the bookmark so that when in the journal, the owl would "peek" out of the top. 


And what journal set would be complete without a matching pen? 


For my second project, I stamped a card.  I started by stamping the Cloudy Days Background onto white cardstock.  Then I used the Martha Stewart Grass Punch to create a layered "lawn" with some cardstock and patterned paper from the kit. 


I stamped, colored and cut out the flower and mushroom and mounted them with foam tape.  The flower has Glossy Accents added on top.  The stitching you see along the left side of the card is actually a rub-on, as is the butterfly.  I added some Tiny Twinkles and some Zva rhinestones to the center of the flower. 


These Key Ingredients kits are exclusive to subscribers.  You can subscribe for 3 or 6 months!  I just LOVE the Key Ingredients kits.  Not only does it make creating super easy since everything is coordinated, but each month you get a fun new kit with some embellishments or accents that you may have never tried.  This month, I got to play with rub-ons.  I rarely use rub-ons, so that was a nice little change for me.  I can't tell you how often I use my Key Ingredients kits.  They last a long time too!  If you like having everything together in one place and not having to "think" about coordination, you will LOVE having a Key Ingredients Subscription! 

For those of you who do have a subscription, we'd LOVE to see your creations using Taylor's challenge!  Create a card/project without stamping and then one WITH stamping and see how many creative ways you can find to use your Key Ingredients! 

For more inspiration using this month's kit, hop on over to see Taylor, Donna, Karen G., Jodi and Melissa

Thanks for stopping by!

Friday, May 14, 2010

Totally Rad


The card I have to share with you today uses today's Viva La Verve Challenge.  The inspiration pieces weren't my usual "style", but I enjoyed the challenge of working out of my norm.  As you know if you visit often, I usually create with bright, bold colors.  They make me happy and bright sunshine to paper for me!  :)  The inspiration pieces Amber uploaded for the challenge were patchwork, quilt and muted colors.  I used a little distressing and punches to make the sketch and inspiration photo work for me.  The stamps are Totally Rad and Dude from Verve.  The background was embossed using the Pajama Stripe Cuttlebug folder.  I do like the end result.  I think the card has a cozy feel to it. 


We'd LOVE for you to play along in the Viva la Verve Challenges!  There always a chance to win some Verve goodness!  Thanks for stopping by today and have a wonderful weekend!

Thursday, May 13, 2010

Isabelle


Some of you have asked about Isabelle or the other kids, for that matter, and you're right. . .it's been a while since I've posted any pictures of them.  I thought I'd share a sweet little picture of Isabelle.  She is 10 months old today!  I can't believe she's 10 months already. . .didn't I JUST have her yesterday?  As you can see, she has 3 adorable teeth!  :)  This picture was taken right after she ate one of her favorite foods. . .carrots!  She's such a happy baby and such a joy! 

Thanks for stopping by today!  Have a great day! 

Tuesday, May 11, 2010

Sunshine

It's another rainy day here in Pittsburgh, so I thought I'd post a little sunshine.  :)  I used some of the newest products from Taylored Expressions.  I used the In the Kitchen Project Pantry Kit along with some cardstock stickers from the Garden Party Project Pantry Kit.  Funny how the kits can look so different, but still coordinate, huh?  The sentiment is from the Garden Party Blooms set.  This card was super fast to put together.  The cardstock stickers made it so easy. . .no coloring needed!  :) 
Thanks for stopping by today!  Hope your day is filled with sunshine!  SUPPLIES USED:  Stamps- Garden Party Blooms (Taylored Expressions); Ink- Tuxedo Black (Tsukineko); Paper- In the Kitchen Project Pantry, Garden Party Project Pantry (TE);  Accessories- cardstock stickers and ribbon from Garden Party Project Pantry (TE), white gel pen;  Finished card measures 5.5"x4.25" 

Monday, May 10, 2010

She Sells Sea Shells


Today I have a card for you using the latest Our Craft Lounge Design Team Sketch.  I used one of the newest releases from Our Craft Lounge called Treasured Friend.  I colored the image using Copic markers and then added some Stardust Stickles for some sparkle.  The ribbon is from Stampin' Up and I added a button to the center of the bow. 

Remember, you have a chance to win some OCL stamps by playing along with the sketch challenge!  There's a new sketch every Friday!  Thanks for stopping by and I hope your week is off to a great start!  SUPPLIES USED:  Stamps- Treasured Friend (OCL); Ink- Burnt Umber (Palette); Paper- Crate Paper; Accessories- button , button twine (PTI), ribbon (SU), Plain and Scallop Oval Nestabilities (Spellbinders), Copic markers, Stardust Stickles;  Finished card measures 5.5"x4.25"

Saturday, May 8, 2010

To the World


Today I have a card to share with you using the latest Viva la Verve Challenge!  Amber does SUCH a fabulous job coming up with the sketches and awesome inspiration photos!  I really do love when I get the chance to play.  If you haven't ever played, I know you'll love it. . .and you get a chance to win some Verve goodness! 


For my card, I started with some Spring Moss cardstock and stamped the flowers from One Person in Raspberry Fizz and Spring Petunia ink (VersaMagic), and the leaves in Tea Leaves (VersaMagic).  Then I used the Picnic Plaid Impressions Plate on the cardstock to give it that same look as the inspiration photo.  The colors were all taken from the inspiration photo too.  I never would have put that teal/turquoise color with these other colors, but I really like the pop it gives!


Remember, until the end of May you can purchase the Beach Party Collection on sale!  Also,  Protector is the May Featured Stamp set and can be purchased at 40% off until May 31 or while supplies last! 

Thanks for stopping by today and have wonderful day!  SUPPLIES USED:  Stamps- One Person (Verve Stamps); Ink- Tuxedo Black (Tsukineko), Raspberry Fizz (PTI), Spring Petunia, Tea Leaves (VersaMagic); Paper- Raspberry Fizz, Spring Moss, Hibiscus Burst (PTI); Accessories- pearls (Kaisercraft), ribbon, Picnic Plaid Impression Plate (PTI);  Finished card measures 6"x3"

Friday, May 7, 2010

Taylored Expressions RELEASE DAY!

You can now purchase all of the NEW ITEMS at Taylored Expressions!  How exciting!  For today, I have to show you a new stamp in the A la Carte line. . .Father's Day!  There are two new stamps available in A la Carte.  You can see inspiration with the other set by visiting the rest of the Baker's Dozen. 


For my Father's Day gift set, I created a card and a "tool tote".  I used the Trendy Tool Tote template from My Time Made Easy to carry some of my dad's favorite beverage.  I stamped and colored the image again and cut out the letters to adhere to the front of the tote. 


The card uses today's TESC on Taylor's Blog.  The papers are The Places You'll Go Collection from My Mind's Eye. 

I also have one more card to show you using the Garden Party Blooms and Garden Party Critters sets from Day 1.  Isn't this little inch worm the cutest?  I just LOVE him.  I used the ric-rac-like image in the set to create the pattern on the bottom part of the card.  The inch worm was colored using a blender pen. 
So, are you ready to go shopping?  :)  Don't forget to visit the rest of the Baker's Dozen to see more creations using the sets!

Alex Maldonado, Carolina Buchting, Donna Baker, Jackie Pedro, Jami Sibley, Jeanie Witmer, Jodi Collins, Karen Giron, Karen Motz, Melissa Sauls, Sandra MacLean, Sankari Wegman and Taylor VanBruggen.

Thanks for stopping by and have a wonderful weekend!

Thursday, May 6, 2010

Taylored Expressions Sneak Peek - Day 2


It's Day 2 of sneak peeks and I get to show more of the exciting new products Taylored Expressions will be releasing tomorrow, Friday May 7th at 8am Pacific!!
My first card uses the newest Cuppie set called Cuppie in the Kitchen!  If you love Cuppie, you'll love this set!  It's perfect for those that enjoy cooking or baking as well as for packaging baked goods or sweet treats!  I popped up the top the pie on my card and sprinkled some "sugar" on top in the form of Dazzling Diamonds glitter.  The image was colored using Copic markers.  The paper is all part of the In the Kitchen Project Pantry kit which includes:

12 sheets of cardstock (10 colored, 2 Choice neutral)
20 sheets of 6x6 double-sided patterned paper from the My Mind's Eye So Sophie Clever Collection
5 yards of ribbon (1 yard each of 5 different styles)
Assorted coordinating buttons
Red Glitter Candy Dots
1 bottle Lime Stickles
1 bottle Mint Liquid Pearls
3 Mini Kraft Bakery Bags

$22.95 OR with Cuppie in the Kitchen Stamp Set $41.50

Our Project Pantry kits are available separately and are totally outside of our subscriptions. 

My next two projects use a new set called Hangin' Out.  This set was concepted by our very own Sankari Wegman and illustrated by Nancy McKinney!  It's a cute little set that is perfect for so many different occasions! 
This first card could be perfect for an engagement or even a bridal shower. . .any kind of "girly" event!  The next card is perfect for welcoming a baby.  I know I can't wait to see how the rest of the Baker's Dozen used these images! 
Be sure to stop and see what the rest of the Baker's Dozen has cooked up for you! 


Thanks for stopping by today!  Please stop back tomorrow for the final sneak peeks!!

Wednesday, May 5, 2010

Taylored Expressions Sneak Peek - Day 1


Today is the first day of sneak peeks for the Taylored Expressions May Release!  All products will be available Friday morning, May 7th at 8:00 am PST.  I have two new, exciting product lines to tell you about! 

This release, we are launching *te* Stamps!!  This is a line of stamps completely designed and illustrated by Taylor VanBruggen herself! She is kicking off her line of stamps with 2 adorable coordinating sets, Garden Party Blooms and Garden Party Critters and our first ever Big Background Stamp, Cloudy Days!!

How awesome is that?  I have ALWAYS adored Taylor's bright, fun, happy style and to see her bring that to life in her own line of stamps is SO EXCITING!  I have not been able to put down my *te* stamps and I'm sure you'll find the same! 

The second exciting product I have to tell you about. . .introducing the Project Pantry!  When you are looking for just the right ingredients to create a new recipe where do you look? In the Pantry of course! Taylored Expressions is introducing a new line of kits called the Project Pantry with just the right ingredients for your cardmaking and paper crafting projects. These kits will be a variation on our Key Ingredients and our Taylored Card Kits. We will introduce them each month at release time and you will have the option to purchase them with or without stamp sets included.

The Project Pantry Kit I have to show you today is the Garden Party Project Pantry. For just $22.95 you'll receive:

• 12 sheets of cardstock (10 colored, 2 Choice neutral)
• 20 sheets of 6x6 double-sided patterned paper from the We R Memory Keepers 72 and Sunny collection
• 5 yards of ribbon (1 yard each of 5 different styles)
• 1 jar of Easy Green loose glitter
• 1 sheet of coordinating cardstock stickers
• 4 coordinating charms (1 each daisy, ladybug, butterfly, and bee)

Or for just $59.95 you get all of the above PLUS TWO STAMP SETS - Garden Party Blooms and Garden Party Critters! All available on Friday May 7th at 8:00 am PST.

For my first project I used Garden Party Blooms for the flower, Garden Party Critters for the bugs and Cloudy Days for the background on the card as well as paper from the Garden Party Project Pantry kit. 

Isn't that cloud background to die for?  I just LOVE it!  I inked it up with Hawaiian Shores ink.  TIP:  The background stamp measures 5.75" square and can be mounted on a clear block to stamp.  I haven't removed my backing because I don't have a block big enough for it yet, BUT I simply lay the stamp face up on my stamping surface, ink it up and then lay the paper I'm stamping on top of it.  You can use a brayer or just your hand to rub the paper so the image "stamps". 
The little Flower favor box is something Taylor is offering this release.  They come in a set of 10 and the colors coordinate with the Garden Party Project Pantry Kit!  For mine, I put some candy in a little cello paper, put the bag inside the bottom part of the flower and then fed the top of the bag as well as the tabs from the bottom of the favor box through the "flower" part of the favor.  I added some ribbon, the ladybug and the butterfly. 

Here's another card using the Garden Party Critters set along with the Garden Party Project Pantry kit.  I know you'll just LOVE these sets as much as I do!

For more peeks using these sets, visit the rest of the Baker's Dozen!

Alex Maldonado, Carolina Buchting, Donna Baker, Jackie Pedro, Jami Sibley, Jeanie Witmer, Jodi Collins, Karen Giron, Karen Motz, Melissa Sauls, Sankari Wegman and Taylor VanBruggen.

Be sure to stop back again tomorrow for more sneak peeks!  Thanks for stopping by today!
LinkWithin

Related Posts with Thumbnails